Saturday, October 1, 2011

Oh No He Didn't.....Plant Blueberries in September???

Our family loves blueberries!!! The thought of picking them out of our backyard just gets me gosh darn excited. So much so that I went out and ordered six plants without even researching when, how, or where to plant them. All of this happened back in the second week of September and the plants arrived quickly so I had to do research fast. Unfortunately, that research revealed that the overall conditions in my yard along with the time were less than ideal for blueberry growth. Here is the checklist of what I did right and wrong:
  • The best time to plant blueberries is during winter = FAIL
    It was hot as heck outside when we planted these the week of September 14, 2011. Word of advice, don't shop for plants until a week or two before they are supposed to be planted. Not two months!
  • Plant blueberries in highly acidic soil, pH from 4.0-5.5, that is high in organic matter and well drained to a depth of at least 24 inches = PARTIAL CREDIT
    I don't know have a device to measure soil pH because I am hoping to show that gardening is not that complicated. Of course if I never pick a single blueberry I will revisit that notion. However, I did plant in a mixture of compost and peat moss at a depth of 24 inches
  • Blueberries must have full sun = PASSThey are getting 8 hours plus where we planted them. Now I have read that the sun positioning may shift with the seasons but it is Oct 1st and I have not observed that.
  • Blueberries should be located at least 20 feet from a house or other structure. Wherever you plant them give them plenty of room. = FAILShow me an urban gardener that has plenty of room! Based on our assessment of the back yard we had no other choice but to plant right in the middle. They are definitely not 20 feet from the yard or the shed.
Ok, enough chit chat. Lets get to the pictures then I will break down the planting instructions step by step. That way if mine die or never fruit you will know exactly what not to do.
In the middle of each of those luxurious of pine mulch is a tiny blueberry plant. Here is another angle showing the spacing a little better.

Thursday, September 15, 2011

Holy Guacamole!

My mom loved avocados!! I remember her eating them all the time when I was a kid. I also remember her poking the seed (stones) with toothpicks and soaking them in hopes that some day she would have her very own tree! Unfortunately, I also remember seeing avocados in the grocery basket every time we went shopping. My mom's wish for an avocado tree never came true but perhaps my luck will be different! I have been planting stuff consistently for the past 3 months without putting the first bean on the dinner table but I figured what the heck, I will give it a shot. Afterall, everything happens for a reason and the last time we went to the market they were giving out free samples of guess what, avocados! That has to be a sign right? We love guacamole but the lady was actually serving salsa, diced tomatoes, and diced avocado on a ritz cracker and it was delicious. We bought everything we needed to recreate this delicious little snack and ate it a few times during that weekend.

So that left me with 3 avocado stones so I figured I would triple my chances. Here are the instructions I followed (compliments of eHow):
1. Clean the avocado stone to a smooth shiny surface. Do not remove the outer skin of the stone.
2. Locate the top of the avocado stone (the pointed end) and insert four or five toothpicks into the sides of the stone about 1/2-inch from the top of the stone and 1/4 inch deep. The toothpick pattern, when inserted into the avocado stone, resembles the spokes on a bicycle tire.
3. Fill a glass jar with water and suspend the avocado stone in the mouth of the jar by the toothpicks. The stone must be submerged at least half way in the water. Never allow the avocado stone to become dry.
4. Set the jar in a warm location. Change the water every two to three days to keep it from growing bacteria, which will kill the avocado stone.
5. Wait three to five weeks for the avocado stone to crack open at the bottom and send out a tap root. Within a week, the top will send out a single shoot. Keep changing the water as needed in the jar.

Read more: How to Plant Avocado Stones | eHow.co.uk http://www.ehow.co.uk/how_5872817_plant-avocado-stones.html#ixzz1Y4dqaHh8

So here are the results of the first 5 steps:

The last step was to set a reminder to change out the water every two to three days. Stay tuned and wish me luck!

Monday, September 5, 2011

Ants in My Pants! Among Many Other Insects....

In my very short and limited experience as a gardener I have made one astute observation, humans are not the only species that LOVE corn!! I was the happiest man on the planet the day my 8 corn plants sprouted and since then they have been eaten alive by bugs. Speaking of being eaten alive, I need to buy a classification book on insect bites just so I can put a name to the multitude of marks currently on my body. And since when did mosquitos evolve to use local anesthesia? I can't feel them until there half full and hanging off of me.

Anyhow, a rough day in the garden is better than a great day at work right? So how do we address the issue of bugs eating the crops? How do we also address severe weather such as heavy rain or frost at the same time? Our solution was to build a couple of enclosures that could be coated with either a plastic tarp or insect cloth or both. Using PVC pipe, cement glue, and chicken wire, along with a ton of tie wraps, here is what we came up with:
Prototype 1 - The Wagon Cover
Strengths:

  • Sloping arch for rain water to run off when covered with tarp.
  • Lightweight and can be removed with one hand.
  • Bottom four posts are notched so that they fit into holes we drilled into the garden frame. We were thinking that this along with the edges of the chicken wire would be enough to deter ground vermin. (hehe, or varmint depending on where you are from)
Weaknesses:
  • The biggest would be that we totally forgot about the trellis!! Now our most prized harvest is hanging out in the air waiting to be eaten, soaked, frozen etc.
  • The enclosure is not tall enough to hold fully grown and hopefully insect free corn.
Prototype 2 - THE CAGE
I haven't watched wrestling in a very long time but doesn't this remind you of something you would see on Monday Night Raw? So much that it gave me the perfect name, THE CAGE! Only time will tell if it is big and tough enough to keep out bugs and the elements.
Strengths:
  • Encloses the ENTIRE square foot garden with room to spare on the trellis side. That way if we actually get vertical hanging plants to fruit they will have plenty of room.
  • Sloped for rain water to easily run off.
  • Tall enough to house an entire row of fully grown corn along with pole beans, watermelons, and cucumbers on the trellis side.
Weaknesses:
  •  It is big!! Too big for one person to lift so a lot of the watering has to be done from 4 feet in the air. This can disturb new sprouts and make it tough to get water to the roots of plants with big leaves.
  • It's not finished yet! As of right now the top is wide open so we need to decide whether to wrap it with chicken wire or just coat it with insect cloth when it comes in. TBD
So the jury is still out on our two prototype enclosures. I am going to order insect cloth this week so hopefully this weekend we will have pictures of the finished products. Here is one last pic of the two enclosures together:

If you want more details on how we built either one just let me know!

    Saturday, August 20, 2011

    Going Bananas?!?! We sure hope so!

    Most people fear a simple and self-sufficient lifestyle because their mind immediately labels it as a tremendous sacrifice to their existing quality of life. I once had someone tell me they weren't interested in wearing pants made out of potato sacks and eating peat moss sandwiches for lunch. That is certainly an extreme example but the best way to get anyone to try something new is to show them that it can be fun and result in something they really love. We love bananas!! We eat them every day with peanut butter so at breakfast one morning I was hit with a crazy idea. We should try to grow our bananas! Why not, it fits perfectly into our self-sufficent journey and could possibly result in plentiful amounts of one of our favorite fruits. So I found a website online (www.banana-tree.com) and for $35 including shipping, ordered two banana rhizomes. The types of bananas we ordered were Goldfinger and Ice Cream.
    NOTE: Read the website return policy very thoroughly prior to ordering. They may only warranty the purchase price but do make sure you know what your options are if you pay $15 for something that never sprouts a single leaf. The site above has no contact phone number but it can be found on the shipping form in the box. Also, the "Contact Us" form on the website appears to be broken or at a minimum, poorly designed.

    Less than ten days later from ordering...

    Wow it was exciting when this arrived at our door!

    Best Case Scenario for this Project

    Of course we planted them immediately not only per the instructions but out of sheer excitement. Here are the rhizomes prior to being planted.

    Goldfinger


    Ice Cream
    For educational purposes, here are the instructions that were included with the rhizomes:
    INSTRUCTIONS for growing the rooted banana rhizomes of: Thousand fingers, Monkey fingers, Cavendish dwarf, Goldfinger, Ice Cream etc..
    As stated on the website, we ship rooted rhizomes and the leaves have been cut off prior to shipping.
    Do not start with a large container. Start with a standard 6" or 8" size container that has a drainage hole. Your soil should be an all purpose soil MIXTURE that allows the water to flow through the soil fairly easy and we strongly urge you to add 20% Perlite (or coarse sand) to your soil mixture. This will assure that your soil will drain easily. Do not use heavy dirt such as is found in a yard and avoid standard type potting soil as it is too heavy. Heavy soils will hold water and cause your bulb to rot.

    Plant with the stem upright and water thorougly. In future watering we suggest that you allow the top 3/4" of soil to become very dry before watering thoroughly. You can fertilize lightly with each watering using a balanced fertilizer as long as you are seeing active growth. Do not fertilize if you are not seeing active growth. An ideal temperature is 69 F or higher with humidity at 60% or higher and a night time temperature of 65 F or higher. Avoid hot dry air. Twelve hours of bright light daily is a norm in most tropics. Many indoor growers of tropical plants use additional lighting to compensate for the lack of sun (especially on those cloudy winter days).

    Allow your plant to become quite crowded before transplanting to the next larger size container. It is normal to lose lower leaves. Newer leaves are constantly being born. Inspect the underside of your leaves frequently to be sure that your plant does not pick up spider mites. WE DO NOT REPLACE RHIZOMES THAT YOU ARE UNABLE TO GROW. Our online catalog is at www.banana-tree.com

    I felt pretty positive about us meeting the requirements to grow these. Living in Florida (USDA Plant Hardiness Zone 9) certainly meets the temperature and humidity requirements. We also had magical "Mel's Mix" soil left over from the square foot gardens. This mix is 1/3 blended compost, 1/3 peat moss, and 1/3 vermiculite. We planted both rhizomes in 8 inch pots that had drainage holes and marked them tracking purposes.

    Our Finished Product - Now Bring on the Sun and Humidity (and cross fingers)
    We will keep you posted on our progress....

    UPDATE: Ok, so it has been a while since I posted but I have been busy! I am pleased to announce that the Goldfinger banana is doing great. Unfortunately, the Ice Cream Banana is D.O.A. and I was unable to get a replacement from www.banana-tree.com. I contacted there customer support on several occasions and received no response. I have since found Ice Cream banana plants on E-Bay for half the price so I will be placing another order soon. Here is a current picture:
    And a close up of the Goldfinger taken on 09/01/11:


    Wednesday, August 17, 2011

    Can Square Foot Gardening Yield a Harvest for a Family of Black Thumbs???

    How can one be truly self-sufficient if they cannot grow their own food? There may be relevant answers to this question but I certainly cannot think of any right at this moment. If you are like me and you take a moment to think about how dependent you are on others for food then you will find it down right scary! I will tackle storing water in another post because the two surely go hand and hand. For now I want to start with our history of "gardening" along with a refreshed attempt now that we have begun our journey.

    Our History of Gardening
    Not sure if you can tell or not but that is an Earth Box with Trellis! This picture tells the perfect story of a short and unfortunate history of gardening. We spent about $100 in total materials and never picked one tomato. We found gardening to be miserable and unrewarding the first time around so with that in mind we needed a fresh approach given the critical nature of this task.

    A Fresh Start
    Enter this book, I actually read it from front to back:
    If gardening had a Tony Robbins of motivational speaking it would be Mel Bartholomew. Upon completion of this book I was not confident that I could grow my own food, I was convinced! He gets you so fired up and makes everything sound so easy that you just can't wait to try it! The concept is simple, build a 4x4 raised bed that is six inches deep and divide it into sixteen squares. Then add the "perfect" soil mix and Voila, a bountiful harvest for all to enjoy. Construction began immediately...

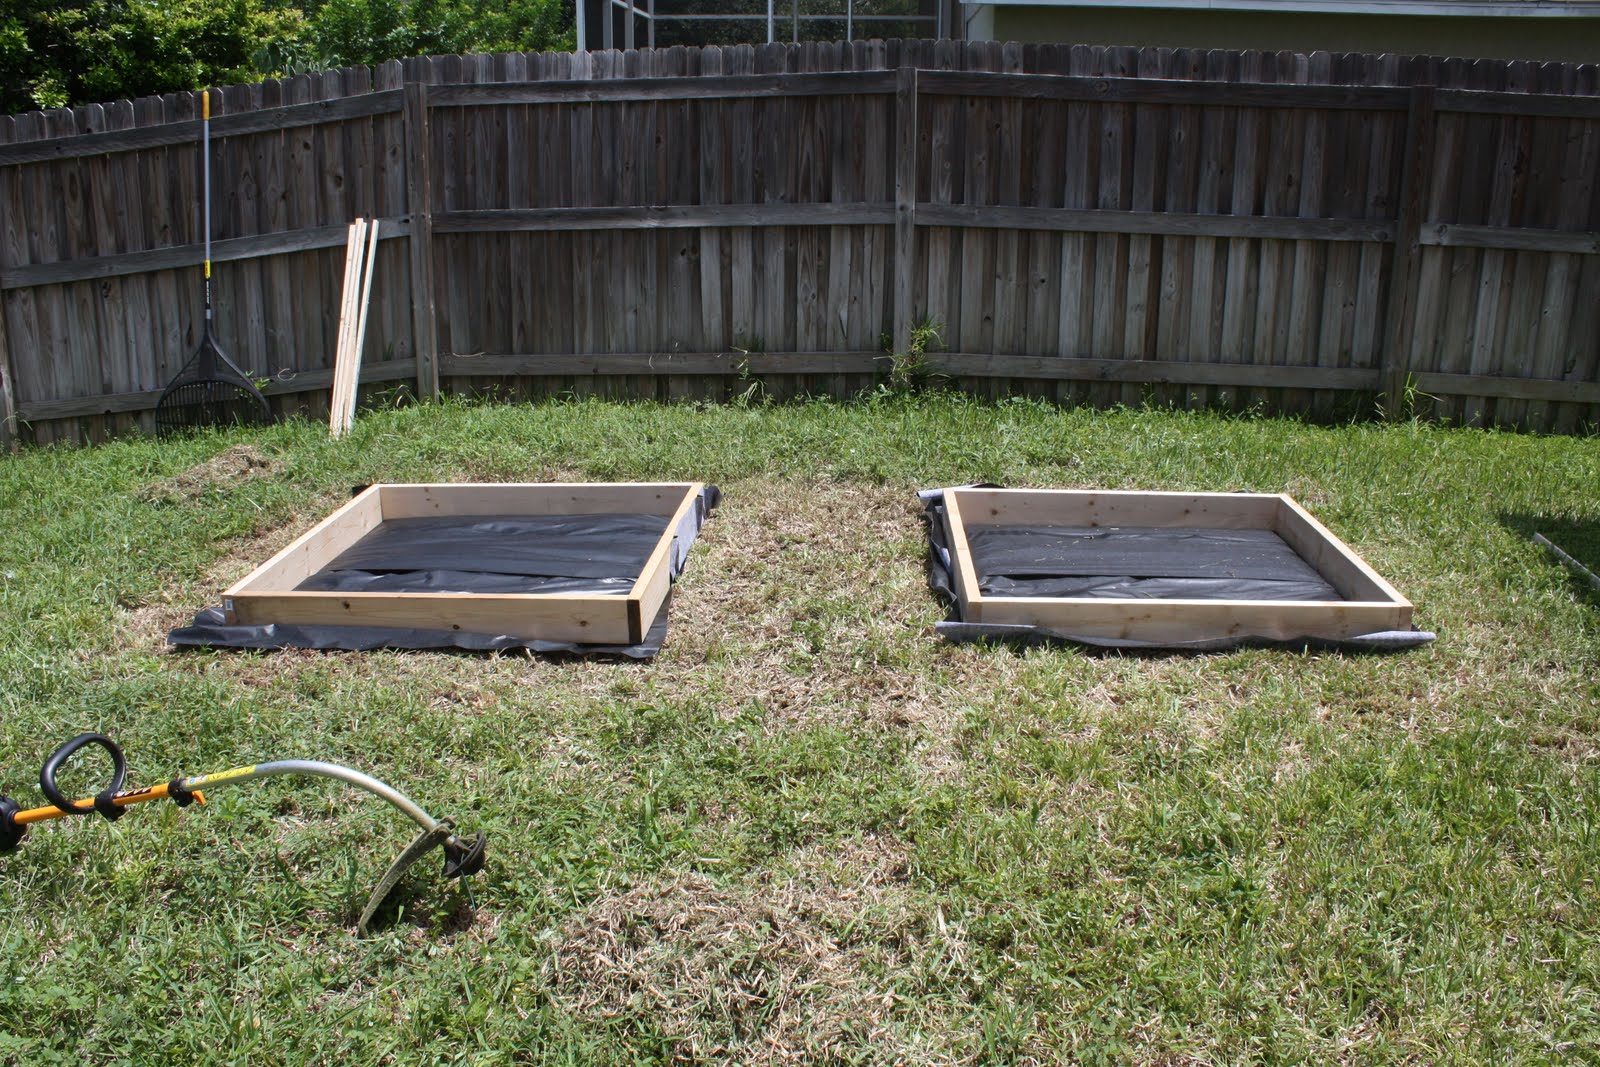
    Following the instructions in the book we made a couple of boxes.

    Creating the boxes seemed pretty straight forward but coming up with a large batch of magical soil known as "Mel's Mix" was a whole other story. Here is the "simple" formula as Mel puts it:
    • 1/3 Blended Compost
    • 1/3 Peat Moss
    • 1/3 Coarse Vermiculite
    Mix equal parts of each, measured by volume, not by weight. The problem is that here in the Tampa Bay area, two of the three ingredients are not easy to find. Furthermore, the blended compost ideally has to be made up of 5 different composts! It took about 3 hours of research and phone calls to find the five sources that I needed. Here they are in case I can save you some time:
    1. Black Kow Manure compost from any major store (Wal-Mart, Home Depot, Lowes etc)
    2. Organic Lawn and Garden Compost from Wal-Mart
    3. Big Earth Landscape Supply at 9502 East MLK BLVD  - PH:813-626-3270
    4. Mother's Organic - Waste Disposal and Humus Farm at 6727 CR 579 - PH:813-628-0600
    5. Hillsborough County Yard Waste Processing Facility at 350 North Falkenburg Rd - PH:813-744-5599
    WORD OF WARNING: The bottom three places sell compost in BULK mainly to major landscaping companies but they also cater to the public. If you are an average joe like me though this presents a problem in the preferred unit of measurement that they use. The lady on the phone politely told me they sold compost by the yard but if she had known I was ignorant she would have said a cubic yard which is a unit of volume that roughly weighs about 2,000 lbs. Anyhow, I borrowed a friends truck, threw a couple of empty storage tubs in the back, and off I went. About a half hour later, with the help of a FRONT LOADER, this is what I got for $8.75
    Yes, I only intended to get two rubbermaid tubs full but what I got was a Spanish speaking Front Loader driver and a quarter cubic yard of dirt dropped right in the bed of the truck! I saw him driving towards me and I was like HOLY CRAP!!! Only $8.75 for all that compost but then I had to pay $49 for a shiny new wheelbarrow just to get it in the back yard.

    So that leaves the remaining two ingredients. Peat moss is readily available but coarse Vermiculite in a 3.8 cubic foot bag is very hard to find. This is what it looks like:
    I found it at Shell's Feed and Garden Supply in Tampa. Really nice folks and they have a good supply of Vermiculite and a really nice guy to help you out to your car too! Here is a link to the website:

    Now it was time to make Mel's Mix, the perfect soil!! Here is a picture of the finished mix:
    We used an 18 gallon storage tub as the perfect measuring cup for each ingredient. The soil looked perfect in my opinion, just like the picture in the book. Now time will tell if it really works!

    Here are what the finished products look like:
    Now it's time to figure out what can be planted in Florida (Zone 9) in the fall. This is an awesome place to start:

    Future posts will explore building of enclosures to protect your garden boxes from pests and critters as well as the first planting of seeds!!!

    Saturday, August 13, 2011

    DIY Compost Bin Using Wood Pallets

    In the words of Margaret Mead, “Never underestimate the power of a few committed people to change the world. Indeed, it is the only thing that ever has.”

    Now isn't that inspiring? So much that it got us out in the sweltering August heat to build our own compost bin.
    Online References
    http://digitalseed.com/composter/bins/palletbin.html
    http://www.lowescreativeideas.com/idea-library/projects/Building-a-Compost-Bin-0109.aspx

    I say "References" because we used a combination of both designs.

    Materials
    - 7 pallets donated from a fast food restaurant currently under construction
    - 3 2x8 pieces of wood purchased from Home Depot
    - 6 paver bricks at .31 cents each
    - Power Drill (We used a DeWalt power drill with an 18v battery)
    - Makita Circular Saw
    - 1 Box of wooden deck screws


    Like any fine artist you must look at the entire canvas prior to beginning your painting. I am not an artist so consider that an assumption. Anyhow, let me show you a picture of our entire backyard so that you can monitor our progress along with us over the course of our journey to Self-Sufficiency.
    Backyard (the Canvas) - Photo 1

    Backyard (the Canvas) - Photo 2

    How We Did It
    Let me know if you want a detailed procedure and we will be glad to put one together for you. Basically, we stood the pallets up in the desired position and then binded them together using pieces of the 2x4 and a box of wood screws. I will let the pictures explain, let me know if you have questions:

    Photo 1 - Position Wooden Pallets
    Photo 2 - Bind Wooden Pallets Together Using Wooden Blocks and Screws

    So far pretty simple right? Now the tough part was making a non-swinging hinged door system that will provide easy access while keeping large critters out. We accomplished this by using the circular saw to create angled pieces of wood that will "lock" in with corresponding pieces on the pallet acting as a door. By keeping it simple we minimized material costs.
    Photo 3 - Angled Hinge System for Pallet Doors


    I must admit though that taking the right pallet door on and off is a total pain in the arse so we are going to review the design and possibly make a revision or two. The last step is to add the brick pavers to lift up the pallets a little off of the grass. Hopefully this will prolong their own decomposition process. You may notice in the picture that we added the remaining pieces of 2x8 along the back side of the finished compost bin. This was not only cosmetic but to help strengthen the overall structure.

    Mel Bartholomew's Quick Compost Advice
    Keep everything moist, make a big pile, and keep turning it. How often? Every day if you want the finished compost in two weeks; every week for results in three months; or every month for it to be ready in a year. The ideal conditions for the fastest results are:
    1. Mix - add as many different, plant-based ingredients as you can find.
    2. Mash - chop everything up in to small pieces.
    3. Moisten - not dry or wet, just moist.
    4. Move - keep turning the pile towards the center where all the action is.
    The results will be the most amazing material you could hope for in your garden. It's often called black gold because of the color of the finished product called compost.


    Composting Resources
    Florida's Online Composting Center - http://www.compostinfo.com/
    NOTE: If you live in Florida your county should provide free Composting Classes and you may even get a free compost bin for attending! If you do not live in Florida your state probably provides a similar service.

    Thursday, August 11, 2011

    Resources for Self-Sufficient Living and Sustainability

    There is a tremendous amount of information on the internet about Self-Sufficient Living and Sustainability. I got my start by reading the Idiot's Guide and one of the first things that jumped out at me was the fact that there are many different variations on Self-Sufficiency. I will list how the book summarizes them:
    • Self-Reliance
    • Simple Living or Voluntary Simplicity
    • Voluntary Poverty
    • Frugality
    • Tradition
    • Homesteading
    • Urban Homesteading
    • Green Living
    • Survival (This could be Survivalists, Preppers, Individualist, Isolationists etc...)
    I will refrain from going to into too much detail on the different types because frankly I am not equipped to do that effectively. I do want to list all of the websites that I have found that pertain to one or many of these variations. Here goes:

    American Livestock Breeds Conservancy
    www.albc-usa.org

    Appliance Repair
    www.bobvila.com/FixItClub
    www.fixitclub.com
    www.repairclinic.com

    Aquaponics - One of the more fascinating evolving sustainable systems in my opinion. I think it is pretty darn cool, especially if you love fish!
    www.aquaponicsusa.com
    www.aquaponiclynx.com
    http://theaquaponicsource.com
    www.morningstarfishermen.org

    Bees
    www.gpnc.org/honeybee.htm
    www.honeybeesonline.com

    Canning and Freezing
    Book - Ball Blue Book of Preserving
    http://www.pickyourown.org/allaboutcanning.htm

    EPA - Residential Efficiency Program
    www.energystar.gov

    Foraging Plants
    Book by Teresa Marrone. Abundantly Wild: Collecting and Cooking Wild Edibles in the Upper Midwest
    Book by Samuel Thayer. The Forager's Harvest: A Guide to Identifying, Harvesting, and Preparing Edible Wild Plants
    NOTE: We live in Florida and I am pretty sure a lot of plants mentioned in the above books may not be indigenous here. I have yet to find good information on foraging in the Southeast.

    Gardening Books and Seed Catalogs/Websites
    Book by Mel Bartholomew. All New Square Foot Gardening (I just finished reading this and we will profile the building of two Square Foot Garden boxes in a future post)
    www.burpee.com
    www.johnnyseeds.com
    www.companionplants.com
    www.cooksgarden.com
    www.dixondalefarms.com
    www.fedcoseeds.com
    http://gurneys.com/default.asp
    www.jungseed.com
    www.kitchengardenseeds.com
    http://parkseed.com/
    www.southernexposure.com
    https://www.superseeds.com/
    www.territorialseed.com
    www.tmseeds.com
    www.totallytomato.com
    www.vermontbean.com
    www.seedsavers.org
    www.victoryseeds.com
    www.banana-tree.com
    www.seedsofchange.com

    Geothermal Heat Pumps
    Geothermal Heat Pump Consortium - www.geoexchange.org
    International Ground Source Heat Pump Association - www.igshpa.okstate.edu
    United States Department of Energy - Geothermal Division - http://www1.eere.energy.gov/geothermal

    Gardening Supplies
    Gardens alive!, www.gardensalive.com

    Hatcheries
    http://www.feathersite.com/Poultry/BRKPoultryPage.html - This is a very extensive annotated list of hatcheries across the United States and Canada and beyond.
    www.mcmurrayhatchery.com
    www.mthealthy.com
    www.ridgwayhatchery.com

    Homesteading
    Book by Coyne, Kelly, and Erik Knutzen. The Urban Homestead
    www.selfsufficientish.com
    www.urbanhomestead.org
    www.themodernhomestead.us
    http://www.journeytoforever.org/
    http://www.soilandhealth.org/

    Housing
    Book by Gregory Paul Johnson. Put Your Life on a Diet: Lessons Learned Living in 140 Square Feet - www.resourcesforlife.com/g
    www.littlehouseonasmallplanet.com
    http://www.resourcesforlife.com/small-house-society
    http://www.tumbleweedhouses.com/

    Insects, Eating
    http://creepycrawlycuisine.150m.com
    http://insectsarefood.com/

    Peak Oil
    www.hubbertpeak.com

    Lawns - Perhaps nothing gets me more fired up than this topic. The American lawn is such a gigantic waste of resources and is so detrimental to the environment. Something must be done about it and I think it starts with Homeowners Associations and what they deem as "acceptable" for lawn presentation.
    Book by Heather C. Flores. Food Not Lawns: How to Turn Your Yard Into a Garden and Your Neighborhood Into a Community
    Book by Fritz Haeg. Edible Estates: Attack on the Front Lawn
    Book by Ted Steinberg. American Green: The Obsessive Quest for the Perfect Lawn

    Phenology -  the study of periodic plant and animal life cycle events and how these are influenced by seasonal and interannual variations in climate. - www.usanpn.org

    Poultry
    Book by Gail Damerow. Storey's Guide to Raising Chickens
    Book by Rick and Gail Luttman. Chickens in Your Backyard
    Book by Judy Pangman. Chicken Coops: 45 Building Plans for Housing Your Flock
    Book by Joel Salatin. Pastured Poultry Profit$

    Rain Barrels
    www.ehow.com/how_4604915_make-rain-barrels.html
    Enter Rain Barrels on YouTube for many more ideas.

    Root Cellaring
    Book by Mike and Nancy Bubel. Root Cellaring: The Simple No-Processing Way to Store Fruits and Vegetables
    Book by Phyllis Hobson. Build Your Own Underground Root Cellar

    Slow Food
    www.slowfoodusa.org

    Survival
    http://www.shtfblog.com
    www.thesurvivalpodcast.com
    www.americanpreppersnetwork.com
    http://secretsofurbansurvival.com

    Survival Foods
    http://www.efoodsdirect.com - There is no meat in any of this food in case you are a Vegetarian.
    www.foodinsurance.com
    www.quakekare.com
    https://ineed2prepare.com
    http://wisefoodchoice.com

    Sustainable Agriculture
    www.sare.org/about

    Well this may be just skimming the surface but you have to start somewhere. Feel free to let me know what I have left out in order to make this list even more beneficial.